
Issue No. 42–January, 1993,
Pinpointing Section Leaks
Finding section leaks can be a real headache. These tough-to-find cable leaks between manholes sometimes take days, even weeks to locate. And, even if you are successful, the leak locating process is often frustrating and expensive. But it doesn't have to be. What you need to pinpoint a section leak is a little patience and persistence, some accurate information, and the right equipment. In this Gazette, we'll provide you with a "tool bag" of tips and techniques to help you become a successful section leak locator (see related article).
First of all, you have to realize that your most valuable tool is your brain. Before you go out and dig for a leak, you need to analyze the information at hand and organize a plan of attack. Never make plans to dig without first having verified the leak's location using more than one analytical procedure or tool.
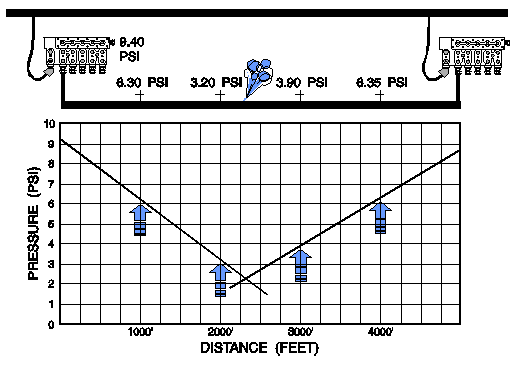
When you suspect a leak, your first task is to determine if the problem is really a section leak or the result of a bigger leak somewhere else in the system. Taking pressure readings on the cable at several locations between two air sources will help answer the question. If cable pressure drops as you move away from one source location and begins to increase again as you approach the second air source, you've got a leak in one of the manholes or sections along the way.

When You're Lucky
In the best case scenario, the section leak will be in a dual feed pneumatic section where the cable has the same pneumatic resistance (same kind of cable) from air source to air source and little or no interlacing. Since we're creating the ideal scenario, let's also say there is only one leak between the two air sources (as in figure above). If you start with this assumption, you can use the Air Flow Calculation (Tool #1) to confirm your suspicion or indicate otherwise.
In the ideal scenario (dual feed section, one leak, no interlacing), the first step in identifying the location of the leak is to use the Five Part Calculation (refer to Tool #2). If you take accurate pressure and distance measurements, this calculation should put you within 10 feet of the leak.
To increase your chances of locating the section leak using the Five Part Calculation, place nitrogen tanks on the cable to create a steeper pressure gradient. For example, if you don't have 8 Pounds per Square Inch (PSI) at each of the air pipe manifolds, you can place tanks set to 10 PSI on both sides of the leak. If you do this, try to make sure that there are at least two pressure testing points between each tank and the section with the leak. These measurement locations are necessary to use the Five Part Calculation.
If you've made a Five Part Calculation and it places you near a manhole rather than somewhere between two manholes, you can use the Direction of Flow Indicator to point to the section with the leak (see Tool #3). This device is simple to use, and it will positively identify the direction of air flow.
Once you've used the proper tools to narrow down the leak to a particular section, there are several other tools available to confirm that the leak is in that section. Two of the most important ones are helium and the B-Gas Indicator (see Tool #4). These tools will not only tell you if there is a leak in the cable, but also whether or not there is duct structure damage in underground conduit. The Cable Locator (Tool #5) will give you a line on the cable so you can place small holes along the cable path to sniff for helium.
If you are able to eventually detect helium in the suspected section, the next procedure is to use an Ultrasonic Duct Probe (Tool #6). This device will identify exactly where you should dig. Make sure, however, that you do not use this tool until you have determined the location of the leak within approximately 10 to 15 feet.
When the Ultrasonic Duct Probe is used without first determining the approximate distance of the leak from one of the manholes, it is easy to make some false assumptions. For example, we've heard of situations where technicians have pushed the tool up a duct and run into some sort of blockage (mud, debris, etc.). They then incorrectly assume they have found the leak and start digging in an area where there is no leak. This expensive mistake can be prevented by first identifying the leak's approximate location using one or more of the tools in this Gazette before using the duct probe.
Once again, when you're looking for section leaks, you cannot rely on just one tool. For example, you wouldn't find a navigator aboard a ship trying to steer a course using only one navigational tool. If he's smart, he'll use buoys, lighthouses, landmarks and all the navigating equipment he has.
Another tool you can use to find a section leak is the Dynatel 573 Sheath Fault and Cable Locator or equivalent (Tool #7). As the name indicates, this equipment will help locate an air pressure leak in a buried or underground section by identifying the location of a sheath fault. Once you have determined the fault location, you can use an Ultrasonic Duct Probe to confirm the location of the leak.
Leaks Close to a Source
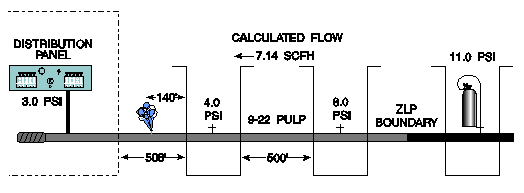
Section leaks close to the central office are easy to identify, but difficult to locate. A significant flow increase at the B-meter panel for a cable indicates that the leak is nearby. To help you zero in on the leak, you can alter the pneumatic section by placing a nitrogen tank in the field (see Figure below).

First of all, calculate a Zero Leak Projection (ZLP) using the air pressure and flow information at the meter panel. Then place the tank on the cable at a point outside the ZLP boundary and set delivery pressure to 11.0 PSI. In the central office, turn off air feed to the cable (creating a single feed pneumatic section ) and allow the system to stabilize.
Using pressure measurements, footage and pneumatic resistance, next calculate the flow rate back toward the office. This information, as well as a pressure reading in the central office, can be used to make a Back Projection. And the Back Projection should put you within five to 10 feet of the leak.
The Hole Truth
Now that you have a whole bag of leak locating tools to pick and choose from, you should be able to pin down any major section leak in your system. If one approach doesn't lead you to the leak, try another. The important thing to remember is that you have to be patient and persistent. And since every leak is different, don't get locked into one procedure. Be willing to use different tools and techniques in different situations.
Most importantly, don't call the back hoe out until you have confirmed the location of the leak using several of the tools presented in this Gazette. The more confirmation you have, the more likely you are to be successful. Often you will hear people brag about their ability to use only one technique to find a section leak in the first hole they dig. "We hit it every time—first time," they'll say. But what they fail to mention is that sometimes the hole is 150 feet long!
So, take a hint from the carpenters: measure twice and cut once.
© 1996-2018 System Studies Inc. All rights reserved.
(800) 247-8255 | (831) 475-5777