Setting Up the Digi PortServer II and Modem Modules
General Information
This document describes how to set up the Digi communications equipment with your PressureMAP
system. The Digi PortServer II® uses a network connection rather than a controller board,
so the PortServer does not need to be physically co-located with the PressureMAP system.
Effective with the Version 21 software release, PressureMAP provides for the administration
and maintenance of up to 10 PortServers (with 64 ports each) per PressureMAP system. This allows
the possibility of placing several units, some local and some remote, to eliminate telephone
toll charges to remote installations.
In PressureMAP Version 20, the Digi RealPort driver is installed as an Incremental Update to the software. In Version 21 and above, the Digi driver can be installed either during the MAP software installation or later via Network Administration in PressureMAP's System Administration module. Please note that you must have access to Network Administration as well as System Administration to perform this procedure.
Specifics:
The Digi PortServer II (Part No. 9800-5417) is shipped with a power supply and connector cable.
An RJ-45 network cable is also supplied if the equipment is to be connected directly to the
PressureMAP system. (If the PortServer II is to be connected to your LAN, no network cable is
included.)
To expand the capabilities of the 16-port PortServer II, one or more 16em port expansion modules (Part no. 9800-5155) can be used with the primary unit. Each 16em port expansion module is shipped with an expansion cable and 16 RJ-11 phone line connectors. Additionally, each expansion module is shipped with a power supply, connector cable, and expansion cable.
If you are connecting the Digi equipment to your LAN, the Digi PortServer II is pre-configured at System Studies for your LAN access. You must configure the IP address, Subnet (or Netmask), and Gateway information in the PressureMAP system. This information can be obtained from your network administrator or IS manager. Be sure to record this information for your reference during the procedure.
WARNING: Once you have set the Digi equipment's network address information in PressureMAP, do not change it. If you change this information after it has been set up, you will lose communication with the Digi equipment.
If you are not connecting the Digi equipment to your LAN, the Digi PortServer II is pre-configured at System Studies with private LAN access. You will need to use a "private LAN" network number provided by System Studies Technical Support for the PressureMAP configuration process.
Procedure:
Schedule an appointment with System Studies Technical Support before beginning installation:
(800) 247-8255 or (831) 475-5777.
- Go to the Network Administration menu in the PressureMAP's System Administration module, and
select option 1, Configure Basic Ethernet LAN Connection. Connect the PressureMAP system to your
LAN and set the Gateway if needed. (Please see Section 6 of the MAP System Administration manual
for more information on configuring your PressureMAP system for a network.)
- Once your PressureMAP system is network configured, the Digi RealPort driver must be installed
in the PressureMAP system.
If your system is Version 20, follow the instructions in Release Note 51 (enclosed) to install the Digi incremental update to the PressureMAP software. When you have completed installing the Digi update, continue with step 3.
If your system is Version 21 or above, refer to the procedures in Section 6 of the MAP Administration manual. Select the "Configure Serial Resources" option from the Network Administration Menu. You should see the Serial Resource Configuration Menu: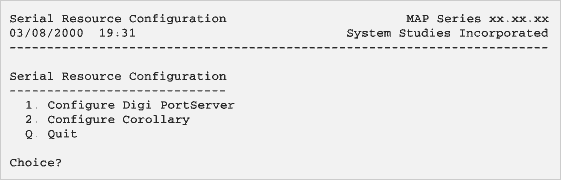
Then choose option 1, Configure Digi PortServer. The Digi PortServer Configuration Menu will appear: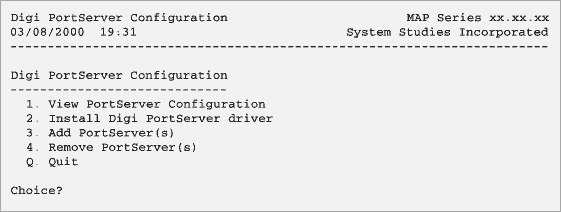
A) Select option 2, Install Digi PortServer Driver. When the Digi driver has been installed, return to the Digi PortServer Configuration Menu.
B) Select option 3, Add PortServer(s), to enter the information for the PortServer being installed. When you have updated the PortServer configuration , return to the System Administration Menu.
- Shut down the PressureMAP computer through System Administration (option 4).
- Unpack the Digi PortServer II, and make sure that the power switch is in the OFF position. Connect
the power supply and network connector as shown in Figure 1. Leave the power turned off.
- Unpack the modem expansion module(s), and make sure that the power switch is in the OFF position. Connect
the power supply. Leave the power turned off.
WARNING: Before plugging in or unplugging the power connection to any Digi equipment, first make sure the equipment is turned OFF. - Connect the expansion module (EBI In) to the PortServer (EBI Out) with the expansion cable. For multiple
modem modules, daisy-chain the units together (as shown below).
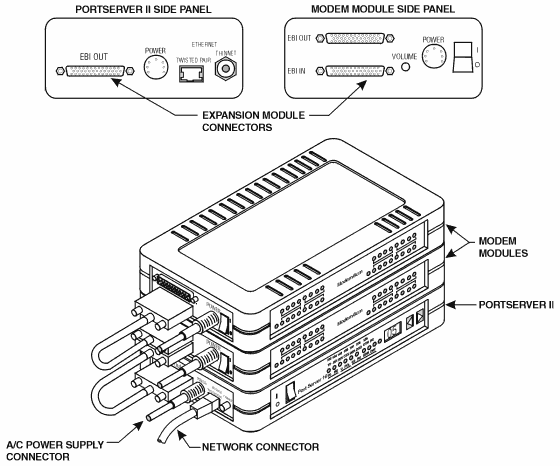
- Plug the phone line connectors into the RJ-11 telephone jacks in the back of the modem module(s).
If you are using modems other than Digi modems for communications, connect them to the ports in the
back of the PortServer II. Be sure to connect each phone line to the correct modem/port, to match what
has been pre-configured in your PressureMAP system.
Note: The ports on the back of the PortServer are numbered 1-16; on the back of the 8em modem module, the telephone jacks are numbered 1-8. In PressureMAP, the PortServer ports are assigned port names A01-A16; the modems in the first 8em module are A17-A24, and the modems in the second 8em module are A25-A32. - Power ON the equipment in the following order:
A) Power up all expansion modules. (Exception: the 16em powers up when the PortServer is turned on.)
B) Power up the Digi PortServer II.
C) Boot the PressureMAP computer.
Any other order may result in unavailable ports.